Cal's Modelin' Tips - Vol. 5


AIRBRUSH --- THE NEXT FRONTIER

 Okay. Let’s get it straight right from the get-go here. I have never used an airbrush. Everything you have seen so far on this site is good ol’ fashioned brush work. Some pastels here, some dry brush there, some color washes here, some gel pens there. You get the point, the stone age, man. So now we tackle the airbrush, and like all new subjects let’s get to the basics first. I am using a Badger Model 150™ Bottom Feed, Dual Action, Internal Mix airbrush. I don’t know what any of that stuff means, but it sure sounds cool doesn’t it? I don’t have a compressor, so I’ll be propelling my medium with; you guessed it, Badger Propel. And did you know that the stratospheric ozone depletion potential of this stuff is zero? Well, it’s true, it says so right on the can! Sure, I want to build models but I don’t want a damn asteroid falling on my head while I’m doing it. For paints I’m going to go with Createx Airbrush Colors mainly because they are ready for use. First time out I don’t want to get too involved in thinning acrylics. From what I’ve heard from other modelers, thinning acrylics down is an art in itself. So I’m chickening out right now, plus the model I’ll be building has colors that are pretty basic and I think I can get the look I want fairly easy. I’ll be using the “transparent” style Createx Colors.
For this exercise I’m gonna’ be building the Revell Robin from Batman Forever kit. It’s gonna’ give us a chance to try out the air brush AND go dabbling around in metallic paints. We’ll give Tamiya Acrylics a shot this time. For those of you familiar with the kit, or the character’s costume from the movie, it has a distinctly metallic look to it. Alrighty, then! Let’s get started...


STEP THREE: Okay, so I’ve got some time to kill waiting for the silver paint to dry, (and dreading actually having to break out my airbrush for the first time!) so I go ahead and get two coats of my award winning ( I wish ) Caucasian skin tone on the head piece of the kit.
--------------------------------------------------------------------------------------------------------------------------
 THE HORROR! - A BREAK FROM THE LESSON PART ONE
 At this point I will venture to save some of you from the frustrating
horror that I mindlessly wandered into. Alrighty, first problem was that my air hose would not attach to my Propel spray can. Apparently, if you are going to use the spray propellant you’re gonna need a “regulator” (see left).This little device will make it so your hose connects to your can. (No needless jokes about that phrase, Okay?) So, I run out to Michaels, burn straight back to the air brush section and try to figure out what it is I need. After some glazed-over-eyes staring into the locked cabinet, I find the regulator; buy the thing and rush back home to the great airbrush experiment. I hook my air brush up to the Propel can, fill up my lil’ chrome paint cup and then slowly begin adjusting the thumb screw on the regulator until a burst of air fills the line. Its time to start spraying something I figure, so I grab an old piece of cardboard that I had lying around and start aimlessly spraying onto it. I practice the “two step” motion of the trigger, down for more air and back for more paint. I mess around with the proximity, closer for fine lines, back for wide spray.

 At this point I’m thinkin’ “this is kids stuff”, so I pick up the Robin model and decide to air brush the muscle detail on his suit. It is now that I realize what a critical mistake I have made……….to make a long story short (too late!) I ended up spraying a mess all over the kit. The damn gun just wouldn’t work right. It was splotching out spider like shapes in parts, at other times nothing would come out of the thing no matter how far back I pulled the trigger, than all of a sudden a torrent of paint would come shooting out, it was awful. The air pressure was all over the map, heavy then light, then nothing! The can itself was cold as all get out, like it was gonna freeze solid. I ended up attempting to do this paint job THREE times. Each time washing off the crappy job I did and feeling more and more like a hack loser. Thank God, I had the good sense to SEAL THE KIT before I began trying this. The only thing I got good at during this session was cleaning the damn air brush! Dejected, defeated and half-crazed, I threw up my hands and headed for the only place I knew I could get some support, Clubhouse. It was there, getting the great advice of so many fine modeling dudes, and dudettes, that I came to the realization that an air compressor was the way to go. Fortunately, I had a small air compressor in my garage, a Campbell Hausfeld Power Pal (see above left). It has a built in regulator and is adjustable from 5 to 100 psi. Another bonus was that it had a 15 foot hose on it that would allow me to put the actual compressor motor (they are kinda’ noisy) in another room while I airbrushed in my office!! So, to summarize for all of you out there trying to learn from this, air cans – Bad! Compressors – Good! Now, let’s get back to the kit and Step 4.
**The following 5 steps are NOT to be followed; I have included them in order to illustrate the kind of things that can go wrong, even when you think they are going right. I did say I would share with you ALL of my learning curve, didn’t I? Read on, Seeker!


**STEP FIVE: Since I’ll be applying two different transparent colors in close proximity on this kit, I gotta go to my Susan Scheewe Blue Masking Fluid and do some mask work. I’ve decided to do the red portions first, so I mask off the belt, and the upper legs leaving a triangle for the “cod piece” (thanks a lot, Joel Schumaker!?!). I go ahead and cover just about the entire upper thigh area front and back, basically because I’m still a super-rookie with the air brush and I’m liable to spray the paint everywhere in some sort of convulsive fit!


 **STEP SEVEN: Okay, Kids! It’s on the crucial air brush moment. Will the Createx Transparent Deep Red work over the silver body with the muscle highlights??? For this job, I change to the Medium tip and needle since I’m not doing any detail, just broad coverage. Starting with the air brush about 4 inches away, and 40 psi on the compressor, I begin. At first I’m freaked ‘cause the paint looks……….PINK! And although Joel may approve of this, I sure don’t, and to my relief the more I lightly layer in the color, the redder it gets. Not only that, but the effect of the muscle highlights underneath the red color is getting me stoked!! I feel like such a professional. After I give it a while to dry, it's time to remove the mask. This always shows up some touch up spots, so I grab the brush and the red acrylic and hide those pesky imperfections!
I do not believe what’s happening to me now. For some inexplicable reason, the green paint mixture comprised of Createx Transparent Ultramarine Blue and Createx Transparent Yellow, is too thin for the gun. Perhaps because I neglected to shake up the bottles before I started mixing. Such was my zeal to continue! Such was my madness!! So as I try to paint the arms, I’m noticing freaky splatters and weird pooling. Feverishly, I am trying to wipe and blot with a paper towel with one hand while holding the still vibrating and buzzing air brush in the other. Yes, still salvageable, I mutter mindlessly while continuing to spray. The evil mixture and the siren like air gun, taunting me, always taunting me to continue! After suffering greatly to complete the two arms, I move quickly, madly, onto the legs. Alas, more of the same hideous paint splatters, pools and runs. Wiping, blotting, spraying, forward always forward. Is there no end to the torment? No respite for me? Suddenly, I’m aghast; one leg is darker than the other! Freak! Quickly now to the bathroom, water, must wash it off, must save the leg! Time passes, like a hallucination, I sense the end is near. Yes, finished, finally finished. Time for the unveiling. As I begin to remove the saran wrap cover of the upper torso, it is only then that I realize the true horror had always been there, hiding, waiting, watching, and laughing as I struggled insanely to complete the gauntlet of the hideous green spray job. For as I peeled back the wrap, there too came the red paint, tearing off the kit and stuck to the plastic wrap in ghastly patches like severely sunburned skin. And yes, at this moment I knew, I had succumbed to the euphoria of the air brush. Rushed the job, didn’t take precautions. Didn’t Dullcote!!! I have now washed the entire kit back down to it’s original silver coat, the last coat that I had the presence of mind to seal, and resign to starting over. Hopefully my fitful story will save some of you from a similar fate!
--------------------------------------------------------------------------------------------------------------------------
STEP FOUR (AGAIN): Okay, as much as I hate to admit it, at this point we, (actually I, because I’m hoping I have spared you a similar indignity), go back to painting in the muscle highlights. I have completely redone the silver portion of the body and sealed it with Patricia Nimrock’s Clear Acrylic Sealer. Using my Badger 150 Air Brush with the fine tip and needle and Createx Opaque Black, I lightly shade in the recessed muscle areas of the kit. I start with the arms to get the feel of the brush then proceed to the torso and legs. Using an air brush takes patience, touch, and time. DON’T try to rush it. I just softly applied the paint in the places I wanted and then went back over them with a few more layers, until I had the look I thought I wanted. Overall, I’m pretty pleased with the results. The proof will come later when I apply the top coat of transparent colors. Seal the job with another light coat of clear acrylic sealer and prepare for the next step. NOTE: There are two different types of air brush paints you can buy, opaque and transparent. Make sure you read the label when you’re shopping.
STEP FIVE (AGAIN): Got some time before I can go on with the body part so I go ahead and paint the back side of the cape with Krylon Semi-Flat Black. I gotta’ tell you, for Batman kits, at least the black movie style Batmans, this Semi-Flat Black is THE color. It’s perfect.


STEP SEVEN (AGAIN): Okay, got to maximize time here since I’ve lost so much with my previous screw ups. I get a first coat of Liquitex Cadmium Yellow Medium on the inside of the cape and let it sit. Let me tell you something, painting yellow is a pain in the butt. It NEVER covers the primer in one, or even two coats. I’ve learned this from previous build ups. So this time, armed with my new tool, I may try something different to finish this cape off. Let’s move on for now.


 STEP EIGHT (AGAIN): Time to finish off the head piece. I’ve already done the skin, so its on to the hair. I start with a base coat of Citadel Colours Scorched Brown. For depth and a more natural hair color, I dry brush on layers of Liquitex Burnt Sienna followed by an ever lighter dusting of Liquitex Raw Sienna. For the eyes I start with Testor’s Grey Primer for the whites. Then, using another new tool I’ve found, Super Fine Brush by Microbrush, I dot the eyes with a circle of Delta Ceramcoat Black. Next, it’s an even smaller dot of a premixed green color (left over from last months Riddler model!) inside the black dot, and then one last tiny dot of black for the pupil inside the green! Whew, talk about dainty work! But the devil IS in the details my friends. For the rims of the eyes I use a whisper thin line of coral pink (again left over from Riddler’s hair color) and then another pass over that with Liquitex Raw Sienna. Man, this make the eyes just pop! I like what I see so I seal the eye work up with a dab of Liquitex Gloss Varnish, which will also give the eyes that wet look. Finishing touches are the pastel work added to highlight the facial features and the lips. This time around I’m using Loew Cornell Soft Pastels. I use a soft brown to highlight the cheek bone area, the jaw line and the neck tendons. For the lips and cheek area I use a light touch of red pastel. The red also looks good on the ears, gives them that more natural look. (Think I’m kiddin’? Go look at your ears in the mirror. See? I told ya’!) When I get that happy all over feeling, I break out the Testor’s Dullcote and preserve the work.
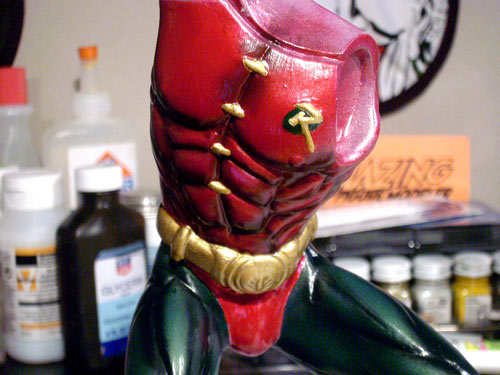
STEP NINE (AGAIN): Red time people! First I mask off the lower portion of the kit. This time I use tape and paper towels, don’t want another saran wrap nightmare. Fire up the ol’ air brush and hit the kit with some Createx Transparent Deep Red. You know the drill by now, light coats, layering until the look is where I want it, then clear acrylic seal.

STEP TEN (AGAIN): Gotta get back to that lousy yellow color on that cape, so I mix up some Liquitex Cadmium Yellow Medium with just a dot of Liquitex Napithol Crimson for a slightly burnt yellow look. This is closer to the color in the picture following so I go ahead and hit the cape with about 4 coats, hand brushed, until it looks nice and solid.
STEP ELEVEN: Getting so close to the end now, I can taste it! Still a few odds and ends are hangin’ out there so I get to tidying up a bit. Paint the gloves and boots with Delta Ceramcoat Black, hit the belt, buttons and Robin insignia with Tamiya X-12 Gold Leaf and let’s not forget that good ol’ cod piece! I trim out the cod area with the Tamiya X-10 Silver and then brush paint on the Createx Transparent Deep Red. Now, his whole suit kinda’ matches and I’m heading quickly towards glue land!


Anybody try this stuff out? Got any better ideas? Email me and let me know!
Labels: Figure Model Building and Painting., Hobby Modeling, Model Kit building
posted by Cal's Models at 5:01 PM
![]()


0 Comments:
Post a Comment
<< Home