Cal's Modelin' Tips - Vol. 3


BUILDING TWO AT A TIME
 Okay, there was a time, and not so very long ago, where I thought anybody who attempted to build more than one model at a time was a lunatic. Just goes to show you how fast things can change here in the ever evolving world of figure modeling madness, as I have decided to construct two, two, two models at once!! Mainly because I am in a hurry to get all my Batman movie figures built so that I can include them in a huge diorama on top of my entertainment unit in my ultra deluxe basement.
So for this exercise I am building the Revell 1/6 scale Batman Forever and the Horizon 1/6 scale Catwoman from Batman Returns. This should be easy given the similar coloration of both figures. With minor adjustments along the way, I should be able to do this. Now let’s get going!

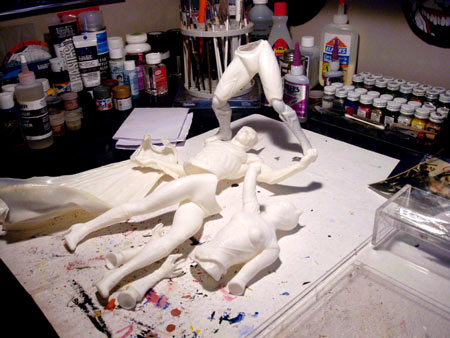 STEP ONE: Like always, thoroughly wash all the pieces of the kit and let dry. Next, I get to heating and trimming. Once both kits are trimmed, I assemble major parts, BUT NOT ALL THE PARTS. If you put the whole thing together and commit to the unforgiving Super Glue, you may have a tough time painting some areas later. Oh, yeah, and while I’m at this stage, I go ahead and put some weight in the lower legs. In my case I am using aquarium rocks. You know the little colored rocks you put in a fish tank? They work real good, and they just happen to be all I have available at the time. I’ve used BB’s before, too. So far I have never used Plaster of Paris, which I am told is the stuff you’re supposed to use, but hey, we’re artists, right?
STEP THREE: Now that the kits are primed, puttied and sanded,

STEP FOUR: Say it loud, I’m black and I’m proud!! Using two different tones of Krylon Black, Semi-flat for Batman, and Hi-Gloss for Catwoman, I apply the base coats of black to both kits. Be very


STEP FIVE: Okay, now I take off the latex masking, clean up any rough lines with detail brush and Le Plume Gel Pen, and we’re ready to start detailing out the faces
and the costumes!
 STEP SIX: Alrighty, then paleface! Time to flesh things out a bit (what a crappy pun!), and fill in the face portions of both models. Then I fill in the eye sockets using my favorite eye color Testor’s Gray Primer. Believe it or not it has a very natural oyster white tone
 that I think works great for eyeballs. At this point the two models are like two paths that diverge in the wood, in other words I have to begin the individual detailing of the two kits, and that makes the job more like building one kit at a time. As you can see, I have already begun painting in the stitches on Catwoman’s costume. But at least we got this far together!?!

STEP SEVEN: These stitches are a pain, I’m not gonna’ lie to you. Patience and a damn thin brush are the keys here. But when I get a little sloppy, its easy for me to go back with a black gel pen and clean up the lines. This technique works really well as long as the figure your building is shiny and black. And for Batman, I dry brush Tamiya Silver over the entire body suit to give it a more metallic look. (I got enough black Batmen!)

 STEP EIGHT: Doing the facial features on Catwoman is an exercise in touching and retouching. Because of the difficult angle for painting, due to the right arm of the character being raised in a weird way, I am forced to keep going back over territory that I have already painted. Anyway, I start with the eyes, filling in the entire eye circle area with black, Then with an emerald green color, made from mixing Testor’s Acrylic Green and Testor’s Grey Primer, I do the iris of both eyes. Eyes, in general, are nerve racking. You’ve got to have a steady hand and a good detail brush. Shifting my attention now to just Batman, first I cover the entire body suit with a black wash (black acrylic, dish soap & water) to deepen the detail in the armor. You can see here how it brings out the high areas and clearly delineates the recesses. Seal the whole thing with two coats of Testor’s Dullcote and we’re ready to move on!

 STEP NINE: Next, for Catwoman, I move to the outer eye detail. I carefully paint the eyebrows and eyeliner on the lids with Delta Ceramcoat Black and a damn thin brush. I don’t really like the way it looks, too thin, so I go back and thicken up the brows and the lower eyelids with a Le Plume Brown Marker. This looks much better. The eyes are really jumping off the face now. Remember me telling you about retouching? Yeah, well I had to go back to the face several times with the original flesh tone (that I saved from the earlier step) to tidy up the fine lines I was painting. Like I said, a steady hand can only get you so far, it looks real pro when you go back and clean up the lines by hiding your gaffs. Then I have to do the make-up. You know, chicks wear makeup, and Catwoman here needs some eye shadow to complete the look. Pastels here we come. I use a odd/even mix of grey pastel and dark blue. I apply it in several coats, taking time between to remove the pastel dust from areas that I don’t want shaded. I do this with a combination of dry and wet brushes. When I’m pleased with the results, I’m ready to dullcote the pastels into place. BUT WAIT!!!!! I got a problem . How am I gonna’ spray the dullcote on her face without screwing up the high gloss look of here vinyl head piece?!?!? Here’s how Sparky, I’m gonna’ mask off the areas with good ol’ Susan Schewee’s Blue Masking Liquid. I mask it off and then give a couple of light blasts of dull cote to the face and we’re ready to rock. Now, back to Batman, on the face I have used some amber pastel and brown pastel to enhance the skin tone, and some red pastel to bring out the lips. Fine lines around the edges of the eye are Liquitex Raw Sienna, and I do the cornea with a Testor’s Acrylic Blue and the pupil with a black Le Plume liquid gel pen. I coat the eyes and lips with Liquitex Gloss Varnish to give them that “wet” look.
 STEP TEN: At the finish line now, folks. For Catwoman, I paint the lips with a Liquitex Primary Red Acrylic, then highlight the outer lip area with a lighter shade of red. When dry, I brush on Liquitex High Gloss Varnish. I add this to the eyes while I’m at it for that wet look. Now I add one last coating of Spray Clear Acrylic Finish to the whole kit, being careful to avoid the face area that I want to be flat finished. Now I can put the arms into place, patch up the seams, paint over the patch job and she’s ready for prime time!! Okay, kids, we’re getting’ excited now because the end is near. Now, on Batman, before attaching the cape, I give a quick dry brush treatment to the back side with a charcoal black color mixed from Delta Ceramcoat Black and Liquitex White. This gives character to the cape, highlighting where natural lighting would on the raised folds.Then I blast it with Testor’s Dullcote for good luck. Before gluing, I heat it up with a hairdryer and try it on for size. And it’s a good thing I did, because I notice the cape is out of shape and won’t allow the figure to stand up. I remove the cape and blast it once again with the hair dryer and “remold” the cape to fit the figure without being too long. Once I’m satisfied, it Super Glue Time!! I affix the cape to the figure, place the trusty Batarang in his hand and….VOILA! See, two kits at once. It can be done but honestly, I think I’ll stick to one at a time. This venture nearly wore me out!!
Anybody try this stuff out? Got any better ideas? Email me and let me know!
Labels: Figure Model Building and Painting., Hobby Modeling, Model Kit building
posted by Cal's Models at 7:38 AM
![]()


0 Comments:
Post a Comment
<< Home